Pi-based tool for displaying VATSIM data
This tool shows a heatmap of arrivals into a selected aerodrome.
- At the top is a bar of active controllers. It will be saturated with controllers who are online. If multiple of one "category" of controllers are online (eg. _E_GND and _W_GND), a small dash will be shown underneath the corresponding box. Up to 3 dashes can be added, showing up to 4 controllers per category.
- In the middle is the main diagram. It is split into rings and sectors. Sectors show the direction of the inbound aircraft from the aerodrome. Rings show time until arrival. By default, there are 8 sectors and 4 rings. Each ring shows a 15 minute band, so the innermost ring is acft with an eta < 15m, the next is 15 < 30m, etc. These are theoretically customisable, but will break if you attempt to change them as of now.
- In each sector/ring combination, the number of aircraft is shown by a colour gradient. No acft is left blank, 1 acft is shown blue, 2 shown green, 3 shown yellow, 4 shown orange and 5 shown red.
- Below this, the ICAO code and name for the selected aerodrome is shown.
The display refreshes every minute. It is refreshed immediately when the aerodrome is changed.
Warning
It's not recommended to change the aerodrome many times within a short timespan, as VATSIM will rate-limit you.
Added airports and control positions are very limited by my own small-scale data collection. By all means contribute to adding positions and aerodromes - I will continue to add slowly over the coming months.
- Raspberry Pi 4 (incl. MicroSD, 16GB recommended)
- Waveshare LCD 2.4"
Note
You must use the Waveshare 2.4" display. Displaying the image generated through HDMI is possible, but something I haven't setup the software for.
-
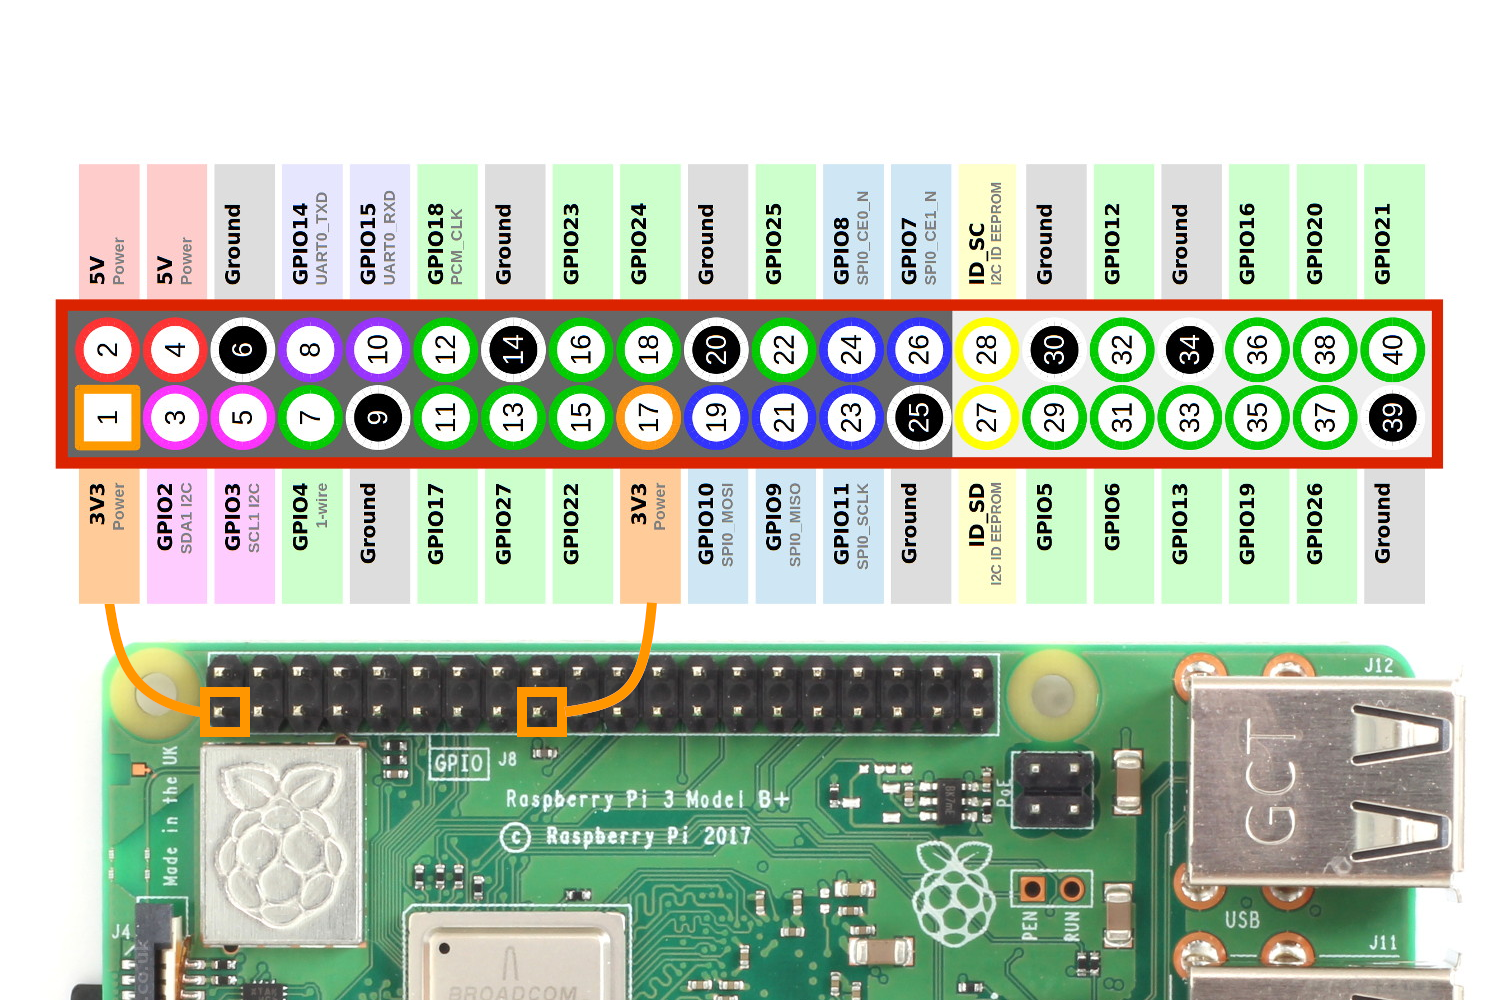
Plug your LCD into the Pi using 8 leads, connecting them as follows:
VCC > Pin 2GND > Pin 6DIN > Pin 19CLK > Pin 23CS > Pin 24DC > Pin 22RST > Pin 13BL > Pin 12For each pin numbered, see here
-
Insert your MicroSD into a separate computer and use the Raspberry Pi Imager to flash it with PI OS 64-bit.
Set (and remember) a hostname, username and password. The username must be the default "pi". Add your WiFi SSID (name) and password. Enable SSH through a password, and flash.
-
Insert the MicroSD into your Pi and power on. Use your router's admin page to find the Pi's IP address, or plug a keyboard and monitor into the Pi and run "hostname -I" to find its IP.
From your PC, run the file
install.batif on Windows orinstall.shif on Linux/Mac and follow the steps given. The software will be set up for you.The file transfer can fail randomly. Attempt at least 3 times before troubleshooting further.
Note
The .bat installer will only run on windows machines, the .sh installer will run on all POSIX-compliant operating systems. If you run into issues, you can manually SCP the files onto the Pi and run installer.py to skip this process.
-
Once done, connect to the Pi through SSH from your computer by entering into cmd
ssh [username]@[ip]and entering your password. You may need to enteryesto mark the device as trusted if it's your first time connecting.Set an airport by entering
set-airport [icao]. The selected airport will be launched on boot, so SSH is only needed to change airport.
- The Pi will automatically host a webpage locally, on the port
8080. Enter the URL[Pi's IP]:8080to visit the webpage. - A brief log of the time, selected airport and number of aircraft shown at each refresh is displayed on the webpage.
- You can use the menu and
setbutton at the top to set a new airport, which will be shown on the Pi similarly to ssh-ing in.
-
To add more airports, edit
airports.py(nano /home/pi/arrose/airports.pyand add the airport's ICAO code and coordinates in the first section, and its name in the second. -
To add positions to be detected for an airport, edit
airport_positions.py(nano /home/pi/arrose/airports.pyand add the positions in the format shown.Save any modifications by entering
Ctrl + O, thenEnter, thenCtrl + Xto leave the editor.